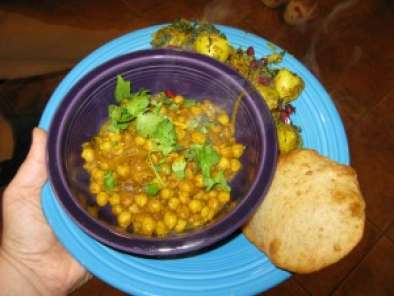
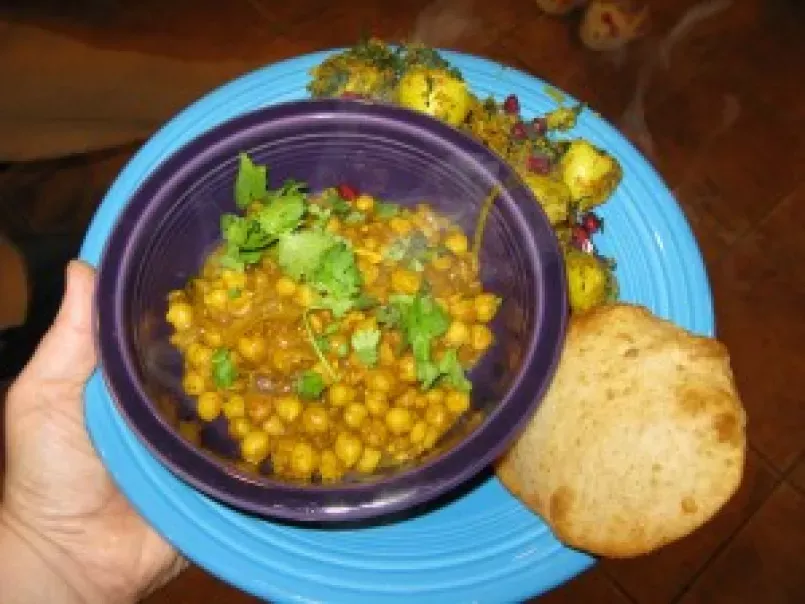
Meatless monday: channa bhatura
vote now

Ingredients
6
Channa Masala II:
You may like
Chickpea curry, the super gourmet vegan recipe
Preparation
Preparation20 min
Cook time2 hours
- First, the night before you want bhatura, make the starter–take your yogurt out of the refrigerator and let it come to room temperature. Then, preheat your oven to about 100 degrees F. by putting it on the lowest heat setting and turning it off just as it reaches that setting.
- Open the oven door, and place an oven thermometer on the rack, and when the temperature dips to 100 degrees F, close the door and keep it closed. Stir the 1/2 cup of all purpose flour into the warmed yogurt, until a smooth paste is formed. Cover lightly with a warm, damp towel or plastic wrap and set inside the prepared oven. Leave the starter undisturbed for eight or ten hours or so.
- Make the dough–put all the dry ingredients into a large bowl and stir to mix it well. Add the starter and the melted ghee, and the honey if you used it instead of raw sugar. Rub your hands with oil or ghee and start mixing the dough with your hands. Add as much water as is needed to make a smooth, reasonably stiff, pliable dough.
- Knead it for eight to ten minutes or until the dough is springy–a fingerprint pushed into it will start springing back almost immediately when you have kneaded it enough.
- Gather dough into a ball, rub the outside with ghee or oil, and put into a small bowl, cover with plastic wrap and let it rest for at least 1/2 hour, or as long as 3 hours. When you are ready to roll out the dough, cut the ball into two equal pieces and roll one into a thick log about 1 1/2 inches in diameter.
- Cut this log into seven equal pieces, and roll each of those into smooth balls. Flatten each one with your hand into a disk about 2 inches in diameter. Dust your surface very lightly with flour, place a disk into the flour, turn over and shake off the excess. Using a rolling pin, roll evenly into a thin 4 inch diameter circle, and set aside until all the other disks are rolled.
- Do the same with the other half of the dough–roll into a log, cut it into seven equal pieces, roll each into a smooth ball, flatten into disks and then roll out into 4 inch diameter circles. Lay them on a plate and cover with a very lightly dampened towel.
- Heat your cooking oil in a wok, karahi or deep saucepan over medium high heat. Test the oil with a dry bamboo chopstick by simply placing it into the oil. If tiny bubbles immediately start traveling up the chopstick tip, the oil is ready. When the oil is ready, carefully slip a single dough disk into the oil so that it goes in flat, not folded. It will sink to the bottom, and immediately the oil will bubble and foam. After a few seconds, the dough will start to rise at the top. Using a slotted spoon or a mesh skimmer, gently hold the dough under the surface of the oil so that it puffs up into a little bready balloon.
- As soon as the bhatura puffs up, hook your spoon or skimmer under it and gently flip it over. Let it brown very gently on the other side–not too much–it will only take a few seconds–then take out the bhatura with your spoon/skimmer and let it drain on layers of paper towels.
- Serve immediately, before the bhatura cool and deflate.
- Channa Masala II:
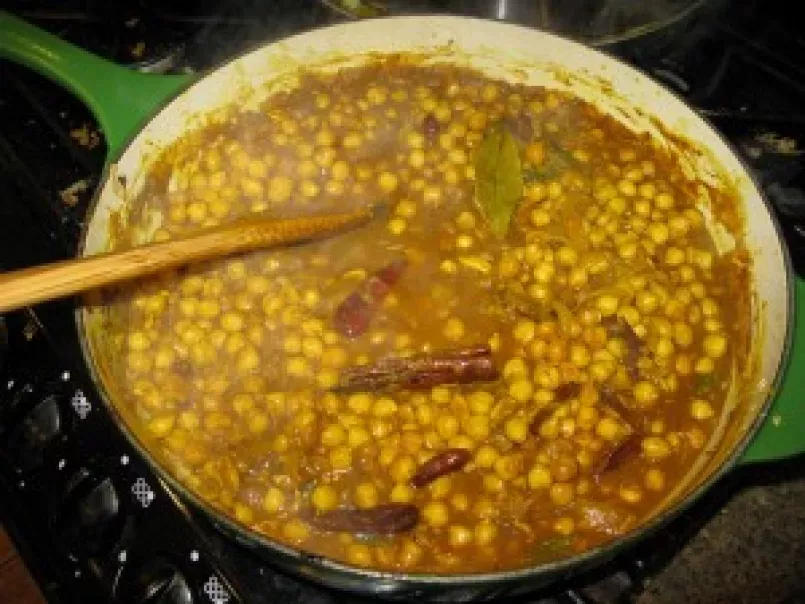
Sort through the chickpeas and remove any suspicious looking (shriveled, black or moldy) beans and any small stones or dirt clods. Rinse well with cold water, then put into a large bowl. Cover well with warm water–the water should stand about an inch over the top of the beans–and cover the bowl and let stand overnight. Drain the remaining water from the beans and discard. Put beans into pressure cooker (or regular large pot) and add water to cover by two inches, one of the bay leaves, the teaspoon of turmeric powder and the powdered cinnamon. Bring to a boil, put the lid on, lock it and bring to full pressure. Turn down the heat, cook on full pressure for fifteen minutes. Then, take the cooker off the heat and allow it to depressurize on its own, gradually. Open the cooker and check the texture of the beans–they should be tender and absolutely done with no crunchy bits. If it is not done, bring to a boil, put on the lid, bring up to pressure, lower heat and cook for another five minutes, then remove from heat and allow the pressure to lower naturally off heat and check again–they should be done at this time. If you do not have a pressure cooker, put the directed ingredients into a regular deep, large pot, and simmer until the beans are done–about an hour. Drain the beans, reserving about a cup of the liquid. Melt ghee in a heavy-bottomed deep frying or braising pan. Add onions, sprinkle with salt and the second bay leaf, and cook, stirring, until the onions turn light golden. Add the whole spices and dried chilies save for the mustard seed at this time, and continue cooking and stirring until the onions turn deep golden brown. Add the mustard seed and the fresh chilies, and cook stirring until the mustard seeds pop. Add the garlic and ginger and lower heat, still stirring, though not as constantly. Grind the remaining whole spices together and add to the pan with the turmeric and the paprika, and cook, stirring until the onions are a deep reddish brown and everything is fragrant. Add the chickpeas and enough of the reserved cooking water to the pan to deglaze the pan. Scrape all the browned bits up from the bottom of the pan and turn the heat down so it can simmer. Allow to simmer uncovered for 1/2 hour to 45 minutes. Add water as needed to keep the curry moist. Thicken the curry with the pappulu podi and add the tamarind concentrate. Simmer for five more minutes and add salt as needed to taste. Remove from heat and sprinkle the cilantro over the channa. Serve immediately with bhatura.
You tried this recipe ?
Mention @petitchef_en and tag #petitchef
Mention @petitchef_en and tag #petitchef
You may like
-
 Chickpea curry, the super gourmet vegan recipe
-
 Malai kofta vegan: chickpea and spinach balls with tomato and coconut sauce
-
 Vegetarian tagine with seitan
-
 Vegetarian enchiladas
Questions
Photos of members who cooked this recipe
Photos
Comments
Rate this recipe:
There are no comments!