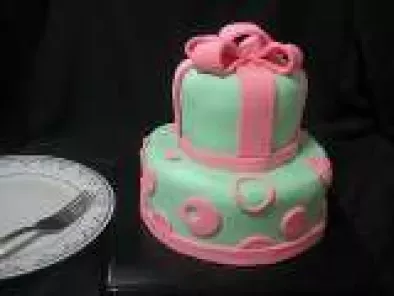
Fondant Cake - Lemon Cake with Whipped White Chocolate Ganache and Raspberry Jam Filling
I've always viewed making fondant cakes or three dimensional cakes for that matter as a complete different field from pastry making; same as bread making, the skills required are different. For me people making special celebration cakes are more of anartistthan a pastry chef or baker. They make wonderful sculptures out of cakes.

Amazing Wedding Cakes is a show I'm frequently watching nowadays, and it inspiredme to give fondant cakes a go. When I was in uni, my friends and I won third place (I think) on a wedding cake competition. Although I have to put that victory into mere luck, I mean we're all completely clueless on what we're doing. An insider told us it was our concept that won us the bronze; so you can imagine our execution... let's say it needed loads of improvement! My second encounter with fondant was in baking school; it was a crash course about fondant cakes wherein most of the learning process was mollycoddled by the teacher. In short, I hardly have any memory on what happened in that particular class...

So it's safe to say this is myfirst official fondant cake projectthat I have to do all by myself. I'm really really happywith the outcome. Before having the guts to do this cake, I researcheda lot online through reading blogs/websites and watching videos from you tube. My self-study sessions really paid off. I learned a lot of tips and tricks in making my first sculpture, which I'll share a little bit later.

As for the cake flavour, I used to have this impression that wedding cakes are horrible tasting cakesbecause when I was a kid all the wedding cakes I've ate were fruit cakes. Well, I'm not a fan of fruit cakes at all! While planning our wedding last year, I had an eye opener encounter. Wedding cakes doesn't have to be a mere fruit cake or other dense cakes; it can also have delectable fillingslike mousses or buttercream. That being said, our wedding cake was the best wedding cake I've ever had so far - vanilla cake with vanilla cream filling and strawberry jam and chocolate cake with chocolate fudge filling.

On second thought, I think the cake I made for this fondant cake project is better than my wedding cake! haha! The cake shop back in England should watch out... kidding! I made lemon cake with whipped white chocolate ganache and raspberry jam filling. It was really really delicious... We shared the cake with my H's colleagues, and they all loved it.

As for my fondant sculpting execution, I know I have loads of polishingto do, but I'm completely satisfiedwith what I've done. I honestly expected my first attempt to be a bit messed up. So yehey for me!
Ok, so to give mytwo centsabout this subject matter...
A. Cake assembly
1.
1.
Decide on what cake you like and how many tiers. So in my case, lemon cake and 2 tiers(6-inch and 3 1/2-inch). I wanted my cakes to have filling so I sliced my cakes into three layers. For the filling, whipped white chocolate ganache and raspberry jam; oh, and vanilla-peach infused sugar syrup(leftover poaching liquid from peach Melba) to brush on the cakes. You also need a mandatory icing for crumb coating (I'll explain later) and frosting; popular choice is buttercream. I used Swiss buttercream.


Once you have all your components, it's now time to assemble the cakes. Start with the bottom layer of your cake, put it on top of a cardboard that's exactly the same diameter as the cake(purpose: to give the cake a stable bottom, especially when putting one tier after the other).
3.
Brush the cake with sugar syrup. (Sorry for the picture, forgot to take one from the very start. You have to brush all cake layers with syrup anyway.)

4.
Then with a piping bag filled with buttercream, pipe a circle around the perimeter of your cake. This will serve like a dam or a guideon how high your filling would be later and prevent the filling from oozing out the sides of your cake.

5.
Spread the filling. First the whipped white chocolate ganache then raspberry jam. Make sure the fillings are within the buttercream ring guide.


6.
Put the second layerof cake and do steps 3-5. Then finish of with the top layer cake, make sure to brush the top layer cake with syrup. Do steps 2-6 to all tiers of cake.

Had to improvise a cake decorating turntable, so I used random tubs around the house!
7. Now both cakes are filled properly, it's time to crumb coat. Crumb coatmeans coating the cakes with a thin layer of icing (buttercream), and letting it chill in the fridge until the buttercream doesn't smudge on your finger when you touch it. The purpose of it is to stop crumbs spreading all over the fondant; keeps the crumbs intact in one place.

8.
Once the buttercream is set, it's time tofrost the cake. A second coat of buttercream, this time a bit thicker. As for the purpose, I have to be honest and say I don't know the purpose. Just that most of my research does the second coating... If I had to guess, I think it's too be able to shape your cake properly, in my case to attempt to make a perfect circle. Like some cakes might be a bit wonky so this is the time tomake up the imperfections. It's tricky though because you have to be skillful to make the icing follow what you want it to do, and the icing has to be spread smoothlytoo. Chill the second coated cakes until the buttercream is set. When that's done, your cakes are now ready for to be stacked with a solid foundation!

B. Building foundation time!
1.
1.
Make your fondant. I planned to make a proper rolled-fondant, but unfortunately I couldn't get hold of 2 of the ingredients. So I made marshmallow fondant. Although, I also had trouble finding white marshmallows, so my fondant had a tint of very light green because of the marshmallows.


Colour your fondant to your preference; I chose robin's egg blue a.k.a Tiffany blue. That was the aim anyway. Then roll the fondant into a circle, big enough to cover the tier you are covering. Cover your cake with fondant.


3.
Place four dowelson the bottom tier, make sure the dowels are of the same height as your cake. Imagine them being four legs of a table, and the top of the table is the cardboard underneath the tier your going to put on top of the bottom tier. So situate the dowels strategically. Oh, it was also hard to find dowels here, so I improvised by using chopsticks!

4.
So four legs done, time to put the the top of the table (the next tier). If you are stacking up more tiers, just remember to put your four legs foundation before putting the next tier. Since I'm finishing off with 2 tiers, it's time to put the final support. A long dowel placed right through the center of the cakes.

Et voila! your cake is now stacked up properly with good foundation.
C. Enjoy designing and sculpting your cake! I only used fondant for my design, but you can also use gum paste, royal icing, chocolate, fresh flowers, etc; your choice. Let your creativity flow!

Well I hope my fondant cake 101 makes sense.
I really really enjoyed this whole experience. It is safe to assume that this won't be my last attempt in making a fondant cake!


P.S. I'll post the recipes of all the components I used in this blog post at Recipe Pieces within this week, promise! Oh, except for the chocolate ganache; it's already posted. Use the same ganache recipe then just let the ganache chill then whip it up. It will look like a mousse.
Bisou bisou,
Charlotte
AMBITIOUS BUBBLE
Comments
Rate this recipe:
There are no comments!