How to make Halloween candy eyes at home with just 3 ingredients
Friday 30 October 2026 12:00 - Patricia González
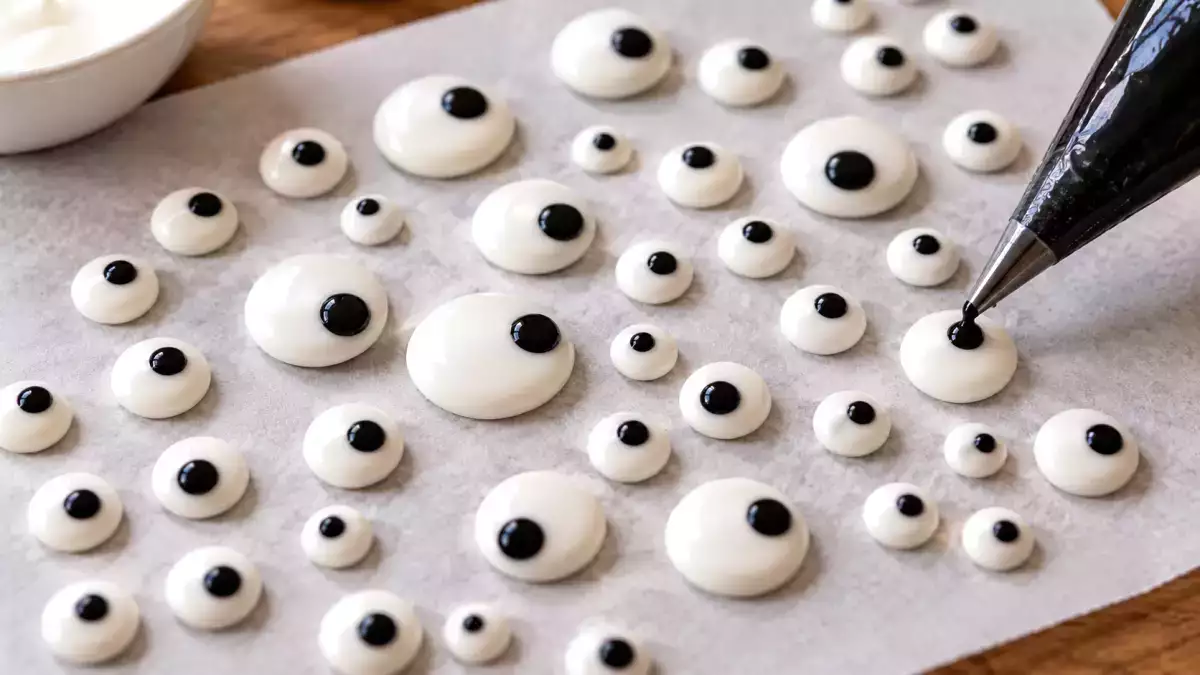
These edible sugar eyes are made from thick royal icing. Make them big, small, surprised or slightly cross-eyed, then use them to decorate cookies, brownies and cupcakes. And because they need time to dry, they are a brilliant little project to tackle before the Halloween rush.
Just three ingredients (and a couple of simple tools)
For a generous batch of small decorations, gather 2 tablespoons pasteurized liquid egg whites (about 1 ounce or 30 g), 1½ to 1⅔ cups powdered sugar (about 6⅓–7 ounces or 180–200 g), and a few drops of black food coloring. That's it!
Use the type of powdered sugar sold as confectioners' sugar in US grocery stores. Cup measurements are approximate because sugar can pack differently, so start with 1½ cups and add more as needed. The finished icing should be thick enough to hold a small dot rather than spreading into a puddle.
You'll also need parchment paper, a bowl, a spoon and ideally two small piping bags. No special kit? Snip a tiny corner from two sturdy zip-top bags instead. The smaller the opening, the easier it is to make neat pupils.
How to make Halloween candy eyes, step by step
1. Mix the white icing. Stir the pasteurized egg whites and 1½ cups of powdered sugar together until smooth, firm and glossy. If the icing flattens quickly when you drop a little onto parchment, mix in more sugar, a spoonful at a time. You want soft peaks that keep their shape.
2. Save some for the pupils. Scoop about 2 tablespoons of icing into a separate bowl. Press plastic wrap against the surface so it doesn't crust over while you pipe the whites.
3. Pipe the white circles. Line a baking sheet with parchment, fill your first piping bag and squeeze out little rounds, leaving space between them. Try a few different sizes: tiny dots for cookies and bigger ones for cupcakes. They don't have to match. In fact, mismatched eyes give your monsters more personality!
4. Add the dark centers. Stir black food coloring into the reserved icing, transfer it to the second bag and pipe a small dot onto each white circle. Center the pupils for a wide-eyed look, or shift them to one side for a funny sideways glance.
5. Let everything dry. Leave the decorations undisturbed until completely hard, ideally overnight. Drying time varies with their size and the humidity in your kitchen; don't rush them into a container while they're still soft.
6. Lift them gently. Once dry, peel the parchment away or slide a thin spatula underneath. If an eye cracks, don't panic: it's a perfect excuse to make a one-eyed monster.
Why pasteurized egg whites matter
Here's one ingredient choice that's worth paying attention to. Royal icing is not baked, so ordinary raw shell eggs can introduce a food safety risk. The US Food and Drug Administration recommends pasteurized eggs or egg products for preparations that will be served without cooking.
Look for cartons clearly labeled pasteurized liquid egg whites and follow the package's storage instructions. Pasteurization reduces risk, but it doesn't make sloppy handling a good idea: start with clean utensils and avoid leaving the wet icing sitting around unnecessarily. If you're preparing treats for someone particularly vulnerable to foodborne illness, consider a commercially prepared icing product intended for no-bake decorations.
Look for cartons clearly labeled pasteurized liquid egg whites and follow the package's storage instructions. Pasteurization reduces risk, but it doesn't make sloppy handling a good idea: start with clean utensils and avoid leaving the wet icing sitting around unnecessarily. If you're preparing treats for someone particularly vulnerable to foodborne illness, consider a commercially prepared icing product intended for no-bake decorations.
The little trick that keeps them from going sticky
Moisture is the enemy of crisp sugar decorations. Let every eye dry all the way through, especially the larger ones, before packing them in a clean, airtight container. Choose a cool, dry cupboard rather than a steamy spot near the stove.
Skip the refrigerator for storing fully dried loose decorations: condensation may soften them when you take them out. If they feel tacky or the black coloring starts to bleed, they need more drying time or a drier environment. Make a test batch before a big party so you know how they behave in your kitchen.
Skip the refrigerator for storing fully dried loose decorations: condensation may soften them when you take them out. If they feel tacky or the black coloring starts to bleed, they need more drying time or a drier environment. Make a test batch before a big party so you know how they behave in your kitchen.
Cupcakes, brownies and cookies: let the monsters loose!
Now for the fun part! Two eyes on a frosted cupcake make an instant monster. Add a pair to a brownie square, or peek them out between white frosting stripes for a mummy cookie. Donuts, cake pops and mini cakes are fair game too.
A dab of frosting or melted chocolate helps the eyes stay put. Add them close to serving time if the dessert is very moist, since wet toppings can soften the sugar. Want more ideas? This Petitchef Halloween treat is a fun place to start:
A dab of frosting or melted chocolate helps the eyes stay put. Add them close to serving time if the dessert is very moist, since wet toppings can soften the sugar. Want more ideas? This Petitchef Halloween treat is a fun place to start:
Halloween graveyard brownie
A delicious and spooky brownie recipe perfect for Halloween! This is an incredibly easy dessert filled with monstrous chocolate. Children will love making this with you, and with our step-by-step instructions, they will have no trouble at all. For...
Make a batch now, enjoy the Halloween fun later
The best part of DIY candy eyes is how much decorating they do for you. Keep a small stash ready, and even the simplest homemade cookie can turn into a character with a wonderfully silly expression.
No perfectly symmetrical dots required, either. Three eyes? Why not! One giant pupil? Even better. When Halloween baking gets busy, you'll be glad you made these little edible faces ahead of time. Happy decorating!
No perfectly symmetrical dots required, either. Three eyes? Why not! One giant pupil? Even better. When Halloween baking gets busy, you'll be glad you made these little edible faces ahead of time. Happy decorating!
 Patricia González
Passionate about cooking and good food, my life revolves around carefully chosen words and wooden spoons. Responsible, yet forgetful. I am a journalist and writer with years of experience, and I found my ideal corner in France, where I work as a writer for Petitchef. I love bœuf bourguignon, but I miss my mother's salmorejo. Here, I combine my love for writing and delicious flavors to share recipes and kitchen stories that I hope will inspire you. I like my tortilla with onions and slightly undercooked :)
Comments